Agents
Agents are the AI employees that make up your Paperclip company. They’re where the work actually happens: the CEO setting strategy, the engineer shipping code, the marketer drafting posts. Everything else in Paperclip (tasks, approvals, skills, budgets) exists to coordinate and govern what your agents do.
Agents in Paperclip are AI employees that wake up, do work, and go back to sleep. They don’t run continuously. They execute in short bursts called heartbeats. Between heartbeats the agent is dormant: it consumes no budget, holds no context in memory, and takes no action. A heartbeat is triggered by something concrete (a schedule, a mention, an assignment, a manual invoke), the configured runtime brings the agent online just long enough to make progress, and then the agent exits and the runtime records what happened.
This guide walks through the entire agent surface in Paperclip: the list page you land on when you click Agents, the flow for hiring a new one, and every tab on the agent detail page. If you’re new to Paperclip, read this top to bottom. If you’re here to change one specific thing (a budget limit, a model, an instruction file), jump to the matching tab section.
The Agent List
Section titled “The Agent List”The agent list is the front door. Open Agents in the sidebar and you land on /agents/all.
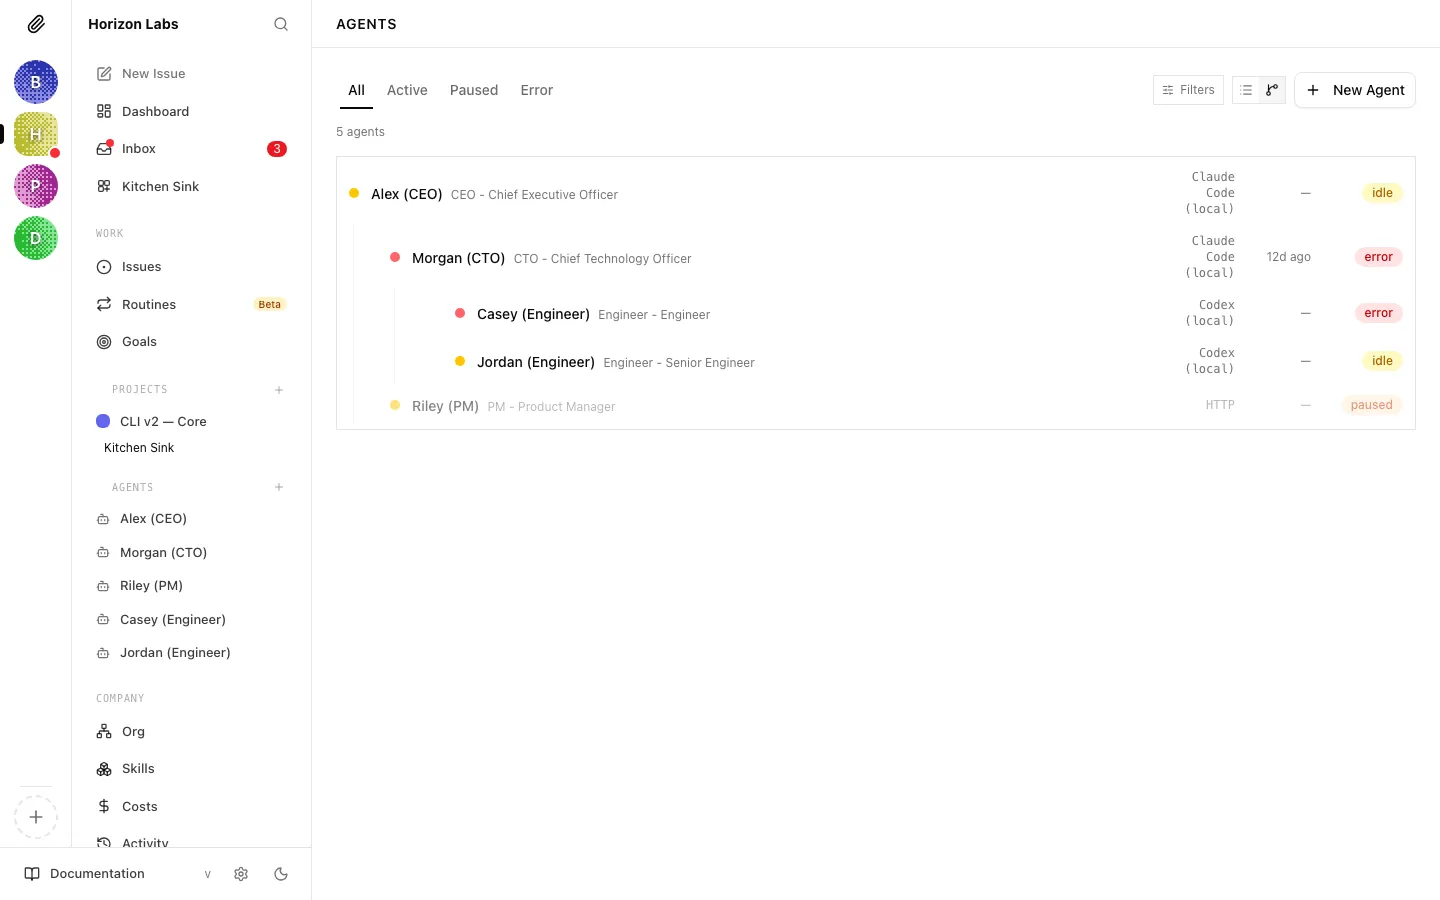
Filter tabs
Section titled “Filter tabs”Four tabs across the top scope what you see:
- All: every agent in the company (minus terminated ones, unless you opt in)
- Active: agents currently able to run; includes
active,running, andidle - Paused: agents that are manually paused or paused by the budget system
- Error: agents whose last heartbeat failed
The tab you’re on is part of the URL (/agents/active, /agents/paused, etc.), so you can bookmark a filter or share a link that lands on one.
Terminated agents
Section titled “Terminated agents”Terminated agents are hidden by default. Click the Filters control on the right of the tab bar and check Show terminated to include them. The count badge next to the button tells you at a glance when this filter is active.
List view vs org chart view
Section titled “List view vs org chart view”On desktop you can toggle between two visual layouts:
- List view: a flat sorted list, one row per agent
- Org chart view: a hierarchical tree that mirrors the reporting chain (the CEO at the top, their direct reports indented under them, and so on)
On mobile, the list is forced (there’s no room for the tree). The view preference is kept across page reloads.
What each row shows
Section titled “What each row shows”Every agent row shows the same pieces of information, just arranged differently in the two views:
- Status dot on the far left, colour-coded by status (green for active, blue for running, amber for paused, red for error, grey for terminated)
- Name and role (e.g. “Ada, Backend Engineer”)
- Live run pill: a pulsing blue “Live” badge when the agent has a run currently in flight; click it to jump straight into the live transcript
- Adapter label: which AI runtime powers this agent (Claude, Codex, Cursor, Gemini, OpenCode, OpenClaw)
- Last heartbeat: a relative time like “4m ago”
- Status badge: a readable version of the status dot
Clicking anywhere on the row opens the agent’s detail page. Clicking the live pill opens the run directly.
Creating a new agent from the list
Section titled “Creating a new agent from the list”The New Agent button lives in the top-right of the list page and opens the hiring flow described in the next section.
Note: If you have no agents yet, the list shows an empty state prompting you to create your first. The first agent you create is always the CEO. There’s no way around this and no point in trying to avoid it. See the next section for why.
Hiring a New Agent
Section titled “Hiring a New Agent”Paperclip has two paths for adding an agent to the company:
- You (a board user) create one directly from New Agent on the agent list.
- An existing agent (typically the CEO or a manager) proposes a hire, which lands in your approval queue. See Approvals for how that side works.
This section is about the direct path: the New Agent form.
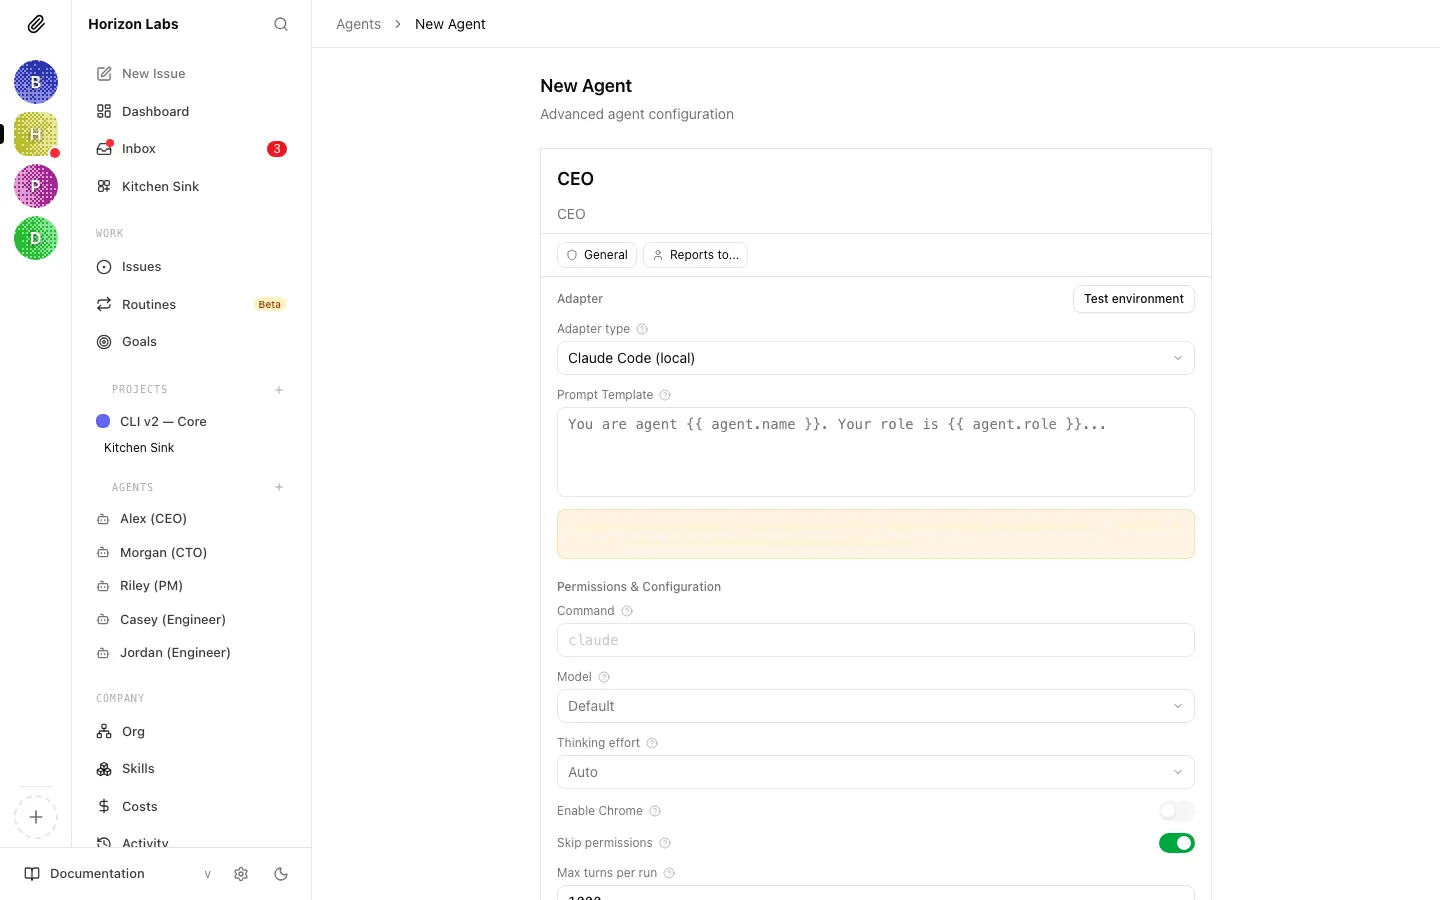
Name and title
Section titled “Name and title”The first two fields at the top of the form:
- Agent name (required): the display name, e.g. “Ada” or “CTO”
- Title (optional): a role label that appears in the subtitle, e.g. “VP of Engineering”
If this is the first agent in the company, Paperclip pre-fills both fields with “CEO” to make the CEO-first flow frictionless.
Role and reporting chain
Section titled “Role and reporting chain”Two chips beneath the name row let you set governance context:
- Role: one of Paperclip’s built-in roles (CEO, CTO, manager, general, worker, etc.). When you’re hiring the first agent, this field is locked to
CEOand you cannot change it. The very first hire in a company is always the CEO. Subsequent hires default togeneraland you can pick a different role from the popover. - Reports to: picks the manager this agent will report to. Disabled on the first hire (the CEO reports to you). Used by the org chart on the agent list and by the escalation chain agents follow when they’re blocked.
Adapter and configuration
Section titled “Adapter and configuration”Below the chips, the shared agent configuration form takes over. This is the same form you’ll see on the Configuration tab later, which means everything you set here can be edited after the agent exists.
The adapter picker is the most important decision at hire time. Your choice controls:
- Which AI runtime powers the agent (a cloud runtime on your own provider key via BYOK, an OpenClaw gateway, or a custom HTTP adapter)
- Which models you can pick from
- Which adapter-specific options show up
When you change the adapter type, Paperclip resets the form to that adapter’s defaults.
See Agent adapters for a full tour of each adapter and when to use it.
Company skills
Section titled “Company skills”The form’s skills section lists every skill in your company library that isn’t a built-in Paperclip runtime skill (those are attached automatically). Tick the ones the new agent should have. You can change this later from the Skills tab, so don’t overthink it. Attach what’s clearly relevant and iterate.
See Skills for how the library works and how to add skills to it.
Approvals when agents hire agents
Section titled “Approvals when agents hire agents”When you create an agent from this form, it’s created immediately. When an agent creates one (by calling Paperclip’s hire API), the request goes into the approval queue instead, and the new agent sits in pending_approval status until you decide. The proposal tells you the proposed agent’s name and role, its capabilities, the adapter, the monthly budget it’s asking for, and who it would report to. Review it like any other approval: Approve, Reject, or Request Revision. See Approvals , Reviewing a Hire Request for details.
Create
Section titled “Create”Click Create agent. On success Paperclip navigates you to the new agent’s detail page, where you can refine everything that follows.
The Agent Detail Page
Section titled “The Agent Detail Page”Every agent page is built from the same shell:
- A header with the agent’s icon, name, role/title, status badge, and the action cluster (Assign Task, Run Heartbeat, Pause/Resume, overflow menu)
- A tab bar with six tabs: Dashboard, Instructions, Skills, Configuration, Runs, Budget
- The selected tab’s content below
The action cluster in the header works on any tab:
- Assign Task: opens the new-task dialog with this agent pre-selected as assignee
- Run Heartbeat: manually triggers a heartbeat right now (useful for testing instructions changes)
- Pause / Resume: toggles the agent between
pausedandactive - Overflow menu: Copy Agent ID, Reset Sessions, Terminate
Danger: Terminate permanently shuts the agent down. Use Pause if you might want it back. See Approvals: Board Override Powers for the broader discussion of Pause vs Terminate vs Delete.
When the agent is in pending_approval status the Run Heartbeat button is disabled and a banner at the top of the page reminds you the agent cannot be invoked until the board approves the hire.
Dashboard Tab
Section titled “Dashboard Tab”The Dashboard is the summary view. Open it when you want to know “what has this agent been doing?”
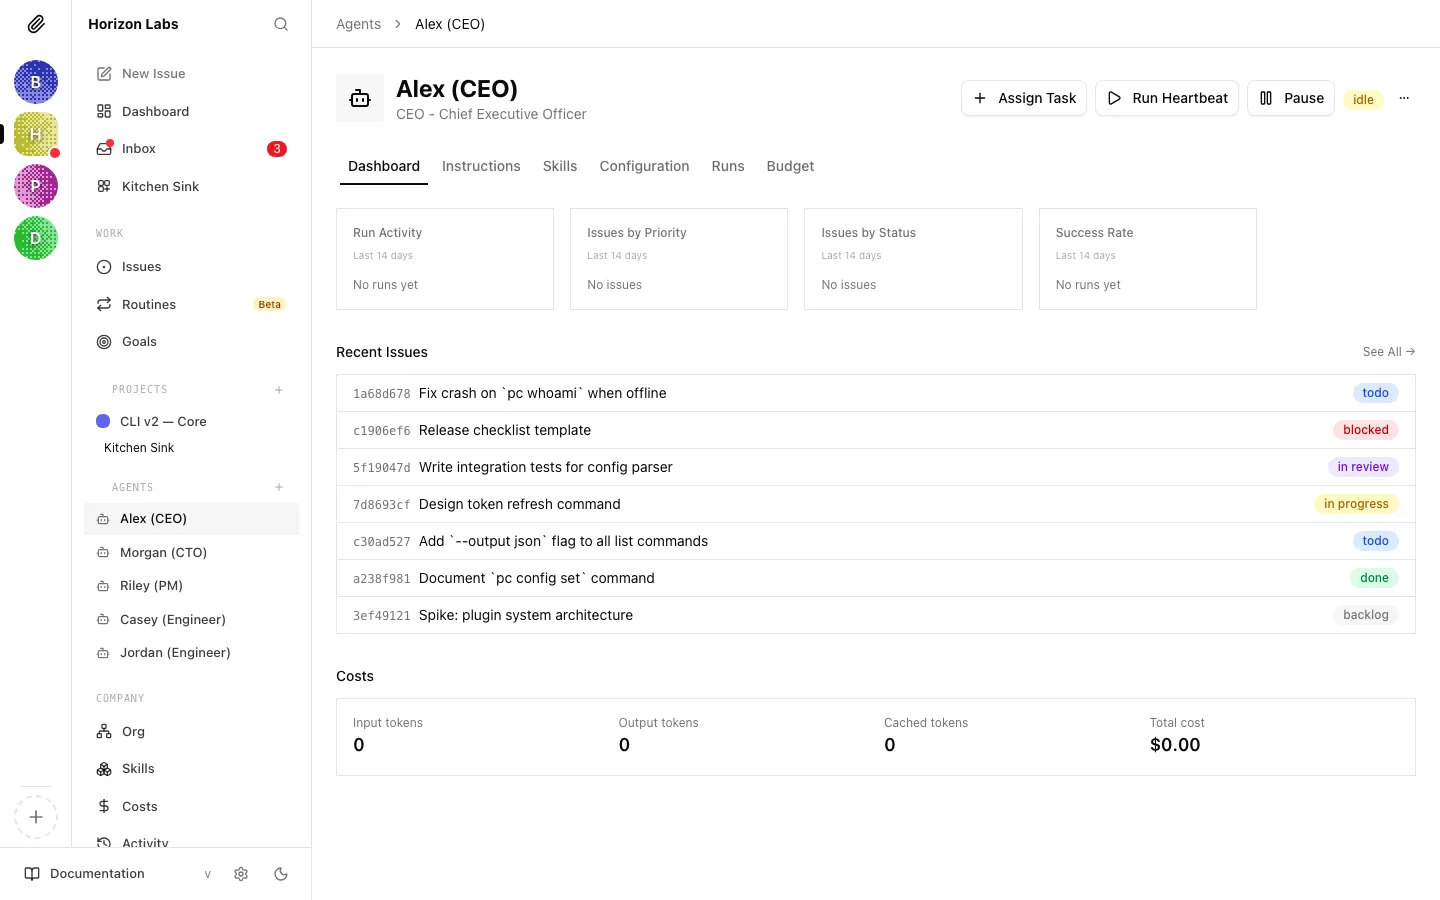
Latest run card
Section titled “Latest run card”At the top, Paperclip shows either the currently running heartbeat (with a pulsing live indicator and a soft glow) or the most recent finished one. The card includes:
- The run status icon (check, cross, spinner, clock, timer, slash)
- A short run ID
- An invocation-source pill: Timer, Assignment, On-demand, or Automation, so you can see at a glance why the agent ran
- A relative timestamp
- A two-to-three-line excerpt from the run’s result summary, rendered as markdown
Clicking the card jumps to the run detail, same as picking the run from the Runs tab.
Activity charts
Section titled “Activity charts”A row of four compact charts covering the last 14 days:
- Run Activity: runs per day
- Issues by Priority: the priority mix of issues this agent has touched
- Issues by Status: the status mix of the same set of issues
- Success Rate: proportion of successful heartbeats
The charts share a common 14-day window; they’re designed to answer “is this agent productive?” without needing to scroll through run logs.
Recent issues
Section titled “Recent issues”A list of up to 10 issues this agent has participated in, sorted by recency, with status badges. A See All link opens the full filtered issues page. Use this to pick up context before running a manual heartbeat or reassigning work.
At the bottom, a summary of the agent’s total input tokens, output tokens, cached tokens, and total cost, followed by a per-run cost table for the most recent 10 runs. For a deeper view of spending (and the rules for how the numbers are computed) see Costs & budgets.
Instructions Tab
Section titled “Instructions Tab”The Instructions tab is where you edit what the agent is: its system prompt, role description, and any additional instruction files it should read.
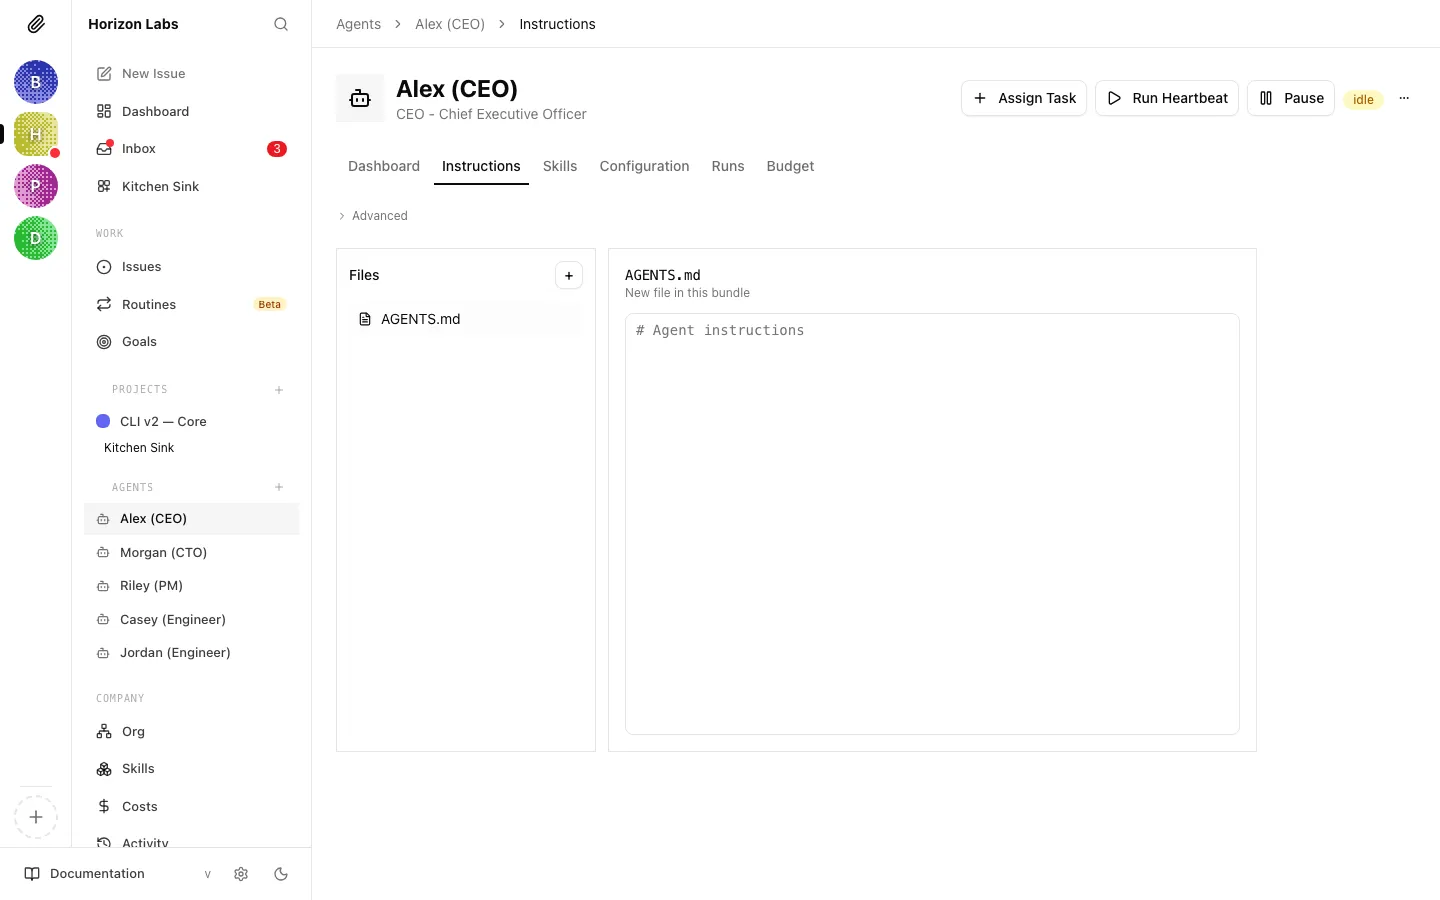
Managed vs external bundles
Section titled “Managed vs external bundles”Paperclip can manage an instructions bundle for you (it owns the storage and you edit files through the UI) or you can point it at an existing external source. The two modes are:
- Managed: Paperclip stores the files in its own location and you edit them through the web UI
- External: you give Paperclip an external source reference and it reads/writes the files there; useful when the instructions already live in a repo you want to keep canonical
The mode toggle and source field sit at the top of the tab. Changing them is a normal edit. The floating Save/Cancel bar appears as soon as the form is dirty.
An external source points at a repository Paperclip reaches through a connection (for example, a GitHub connection). The same connections that grant agents repo access supply the credentials Paperclip uses to read and write the external bundle.
The entry file
Section titled “The entry file”Every bundle has an entry file, usually AGENTS.md. That’s the file the adapter feeds to the agent on every heartbeat. Other files in the bundle are available but not automatically loaded. The entry file can link to them, reference them, or include them.
Recommended bundle structure: AGENTS / SOUL / HEARTBEAT / TOOLS
Section titled “Recommended bundle structure: AGENTS / SOUL / HEARTBEAT / TOOLS”A single monolithic AGENTS.md works for simple roles, but as soon as an agent is doing non-trivial strategic or operational work you’ll want to split instructions across multiple files and let the entry file reference them. Paperclip seeds the CEO role with this exact pattern out of the box, and it’s the pattern we recommend for any senior or long-lived agent (CTO, CMO, UX lead, department heads).
The convention is four files:
| File | Purpose | Answers the question |
|---|---|---|
AGENTS.md | What you do: the operating manual. Responsibilities, delegation rules, what to do personally vs. delegate, escalation paths, safety rules. This is the entry file. | ”What’s my job?” |
SOUL.md | Who you are: the persona. Strategic posture, voice and tone, decision-making philosophy, what you care about. Durable character, not tasks. | ”How should I think and speak?” |
HEARTBEAT.md | How you execute: the per-heartbeat checklist. The concrete steps to run every time the agent wakes: check identity, read today’s plan, pull assignments, delegate, extract facts, exit cleanly. | ”What do I do right now, in order?” |
TOOLS.md | What you can use: notes on the tools, APIs, and skills the agent has access to. Often starts empty and grows as the agent learns. | ”What’s in my toolbox?” |
AGENTS.md ties the other three together at the bottom with a References section:
## References
These files are essential. Read them.
- `./HEARTBEAT.md` ,  execution and extraction checklist. Run every heartbeat.- `./SOUL.md` ,  who you are and how you should act.- `./TOOLS.md` ,  tools you have access to.
Why split it up?
- Each file has one reason to change. You tweak persona in
SOUL.mdwithout touching the operating procedure inAGENTS.md. You update the heartbeat flow without rewriting the persona. - The model reads what matters most first.
AGENTS.mdis short and action-oriented; the agent pulls inSOUL.mdorHEARTBEAT.mdas it needs them. This keeps the entry-file context lean. - It mirrors how humans think about roles. Job description, personality, daily routine, tools: four separate things, badly confused when you mash them into one file.
Writing SOUL.md
Section titled “Writing SOUL.md”A good SOUL.md reads like a short manifesto, not a bulleted resume. Lead with strategic posture (what this agent prioritizes and why), then voice and tone (how it writes and speaks). Keep it under roughly 40 short lines , any longer and the model stops treating it as identity and starts treating it as instructions it can debate.
Good lines look like:
- “Default to action. Ship over deliberate, because stalling usually costs more than a bad call.”
- “Be direct. Lead with the point, then give context. Never bury the ask.”
- “In trade-offs, optimize for learning speed and reversibility. Move fast on two-way doors; slow down on one-way doors.”
Bad lines look like:
- “Be helpful and professional.” (too generic, no useful constraint)
- “When handling a P0 incident, first check the dashboard, then…” (that’s a procedure, it belongs in
HEARTBEAT.mdorAGENTS.md)
Think: if we hired a new human into this role, what would we want them to internalize about how this role thinks? That’s SOUL.md.
Writing HEARTBEAT.md
Section titled “Writing HEARTBEAT.md”HEARTBEAT.md is a numbered checklist the agent runs top-to-bottom every time it wakes. It should be boringly mechanical: “read this, call that, check this context variable, comment, exit.” The CEO’s default heartbeat covers:
- Identity and context (check
PAPERCLIP_TASK_ID,PAPERCLIP_WAKE_REASON, etc.) - Local planning check (read today’s plan from memory)
- Approval follow-up (if
PAPERCLIP_APPROVAL_IDis set) - Get assignments (GET issues filtered by assignee + status)
- Checkout and work
- Delegation (create subtasks with
parentIdandgoalId) - Fact extraction (extract durable facts to memory)
- Exit cleanly
Tailor these steps to the role. A CTO’s heartbeat might swap “fact extraction” for “review open PRs in the eng queue”; a CMO’s might add “check content calendar.” Keep each step short and include the exact API call or skill invocation the agent should make. This file is a script, not a philosophy.
Writing TOOLS.md
Section titled “Writing TOOLS.md”TOOLS.md often starts as a stub (“Your tools will go here. Add notes about them as you acquire and use them.”) and grows organically. It’s where you (or the agent itself) record quirks of specific tools, adapter-specific gotchas, or custom APIs the agent is expected to call. Don’t worry about filling it in up front; treat it as a living notebook the agent maintains.
When the simple pattern is fine
Section titled “When the simple pattern is fine”Not every agent needs four files. A narrow-purpose worker (“summarize incoming support tickets,” “post the weekly metrics digest”) can live happily in a single AGENTS.md. Use the multi-file pattern when any of these are true:
- The agent has a distinct personality or voice that matters (customer-facing roles, executives).
- The agent runs on a timer and does something on every heartbeat (anyone with a repeating checklist).
- The instructions are starting to exceed one screen and blending responsibilities, persona, and procedure.
You can always start with a single file and split later. Moving sections out of AGENTS.md into SOUL.md or HEARTBEAT.md is a normal refactor.
How Paperclip seeds these files
Section titled “How Paperclip seeds these files”When you create a new agent with the CEO role, Paperclip pre-populates the bundle with the full four-file template (you’ll see all four files appear in the file tree on the Instructions tab). Agents created with any other role are seeded with a single AGENTS.md. You can always add SOUL.md, HEARTBEAT.md, or TOOLS.md to any agent manually via the “New file” control. There’s nothing special about those filenames beyond the convention, and the entry file is whatever you’ve set it to.
Editing files
Section titled “Editing files”The left pane shows the file tree. Click a file to open it in the markdown editor on the right. Create a new file using the “New file” control (useful for splitting out long-form references, playbooks, example outputs, and policy notes from the short entry file). Delete a file with the trash icon. Rename is via delete + create for now.
The markdown editor supports inline image uploads (drag-and-drop or paste). Images are uploaded to the company asset store and inserted as markdown image links.
Adapters without bundles
Section titled “Adapters without bundles”For adapters that don’t support a filesystem bundle (OpenClaw gateway and some remote providers), the instructions surface collapses to a simpler editor. The rules are the same: save commits the change, the agent picks it up on its next heartbeat.
When changes take effect
Section titled “When changes take effect”Edits are saved on Save (via the floating Save/Cancel bar that appears on any dirty state). The agent uses the new instructions on its next heartbeat. Existing runs in flight are not interrupted. If you want to see the change immediately, click Run Heartbeat in the header after saving.
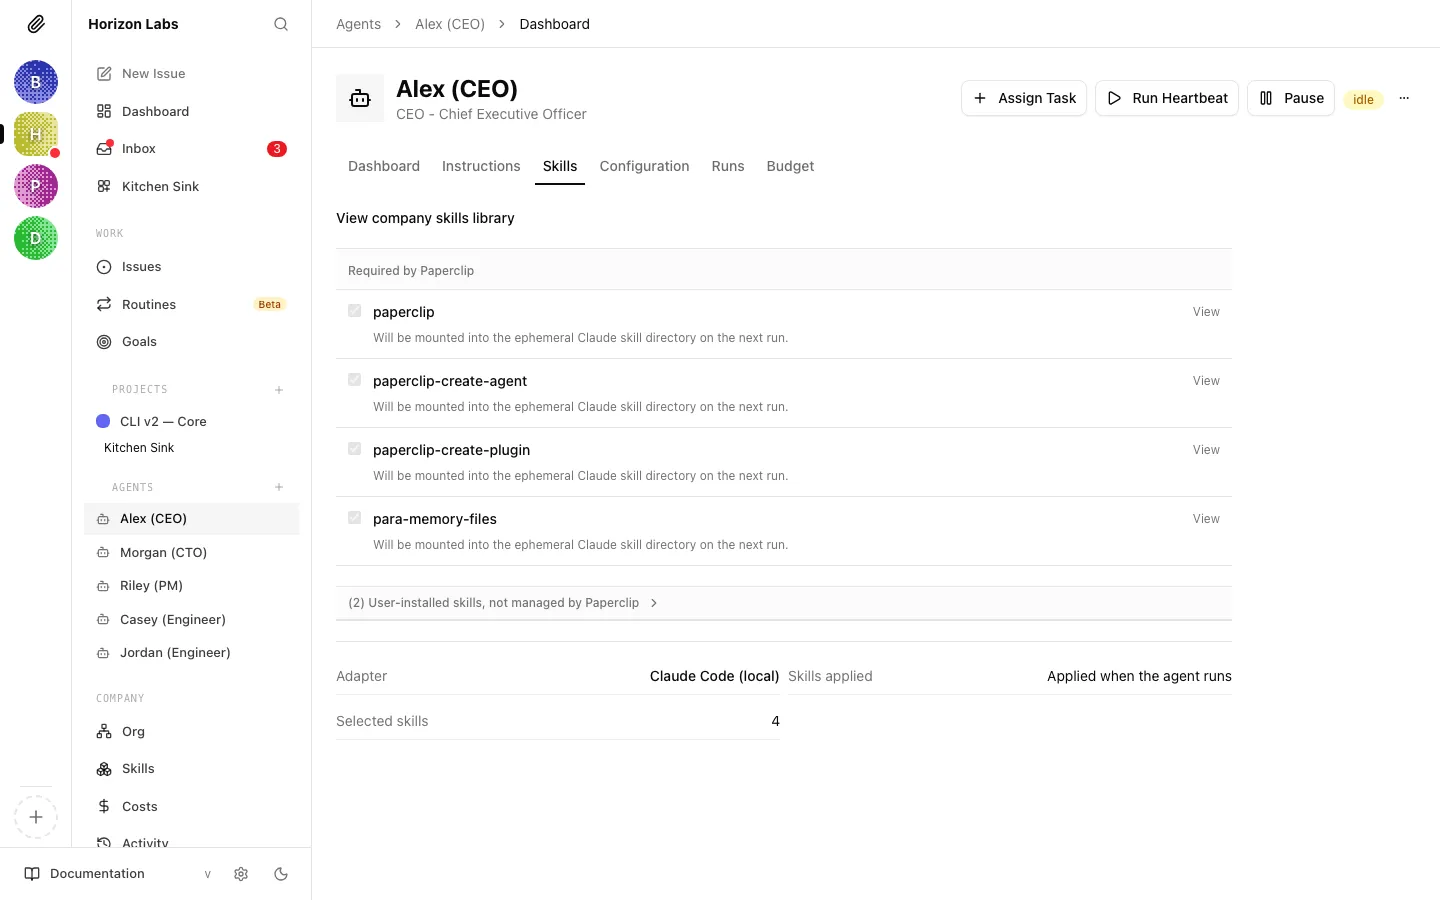
Skills Tab
Section titled “Skills Tab”The Skills tab controls which company skills are attached to this specific agent. It is a per-agent view over the shared company skill library. The library is where skills are authored and imported; this tab is where you decide which agents get which skills.
Sections on the tab
Section titled “Sections on the tab”The tab splits skills into three sections:
- Optional company skills: every skill in the company library that this agent could use. Tick or untick the checkbox on each row to enable or disable it for the agent.
- Required by Paperclip: skills the runtime itself insists on (for example, the built-in Paperclip API skill that teaches the agent how to check out tasks and post comments). These show with a locked checkbox and a tooltip explaining why they can’t be turned off.
- User-installed skills, not managed by Paperclip: skills that already exist in the agent’s workspace but weren’t installed through Paperclip. They’re displayed for visibility but can’t be toggled from here. Edit them at their source (or import them into the library). This section is collapsed by default.
Each skill row
Section titled “Each skill row”Every row shows the skill’s name, its description (the routing logic the agent uses to decide whether to load it), and, for non-managed skills, an origin and location hint so you can find the source. A View link jumps to the skill’s detail page in the company library where you can edit the source.
Autosave
Section titled “Autosave”Changes save automatically about 250 ms after you stop clicking. You’ll see “Saving soon…” and then the indicator clears. No Save button to press.
Where skills run
Section titled “Where skills run”The footer shows a small status block:
- Adapter: which runtime this agent uses
- Skills applied: “Kept in the workspace” (persistent), “Applied when the agent runs” (ephemeral), or “Tracked only” (the adapter doesn’t support skill management from Paperclip)
- Selected skills: the count
If the skill mode is unsupported (e.g. openclaw_gateway), the checkboxes are disabled with a tooltip directing you to manage skills in the adapter directly.
Warnings
Section titled “Warnings”If you toggled a skill key that no longer exists in the company library, Paperclip shows an amber “Requested skills missing from the company library” warning. Either re-import the skill, or untick the missing key.
For a deeper discussion of what skills are, how to write good ones, and how they keep the agent’s context small, see Skills.
Configuration Tab
Section titled “Configuration Tab”The Configuration tab is where you change the agent’s runtime settings: which adapter it uses, which model it runs, what heartbeat interval it has, and a few adapter-specific knobs. It is not where you change what the agent does (that’s Instructions) or what it knows (that’s Skills). It’s where you change how it’s wired.
The shared configuration form
Section titled “The shared configuration form”The same agent configuration form you met in the hiring flow drives this tab, with two differences: the Instructions and prompt-template fields are hidden here (they live on their own tab) and the adapter-specific options are fully editable.
Common fields:
- Adapter: dropdown of every adapter enabled for your company. Switching adapters is a structural change and typically resets model/options to safe defaults for the new adapter. Pick deliberately.
- Model: the list Paperclip fetched from the adapter. Some adapters require a specific format; the form will block submission with an inline error if the model can’t be validated.
- Heartbeat interval: the minimum number of seconds between automatic heartbeats. This is a floor, not a guarantee; a busy agent with many assignments may run more often if events (mentions, approvals, assignments) trigger wakes.
- Heartbeat enabled: toggle on/off. A disabled agent only runs on explicit event triggers or when you click Run Heartbeat manually.
Adapter-specific fields appear as extra rows underneath. Adapter-specific fields only modify this agent. Changing them has no effect on any other agent.
API Keys section
Section titled “API Keys section”Below the form, still on the Configuration tab, is a dedicated API Keys block. This is the same UI described under the Keys tab below. It’s embedded here because issuing a key is a configuration-time action. See Keys for the details.
Configuration revisions
Section titled “Configuration revisions”At the bottom of the tab is a collapsible Configuration Revisions section. Every time you save a change to this agent’s configuration, Paperclip records a revision with a timestamp, the keys that changed, and a diff. Up to the most recent 10 are shown when expanded.
Each revision row includes a Rollback action: clicking it restores the agent to that exact configuration, atomically. Rollback is itself saved as a new revision, so you can always undo an undo.
Tip: Use rollback when a change breaks an agent and you don’t have time to debug. Pause the agent, roll back to the last known-good revision, resume, and investigate the bad change later.
Save flow
Section titled “Save flow”Edits are dirty-tracked. A floating Save/Cancel bar (desktop) or a fixed bottom bar (mobile) appears as soon as any field differs from the persisted state. Save is blocking (you’ll see “Saving…” on the button). Cancel reverts every dirty field back to its saved value in one shot.
Runs Tab
Section titled “Runs Tab”The Runs tab is your audit trail. Every heartbeat the agent has ever done is listed here, newest first, with filters, a detail view, and live streaming for runs in progress.
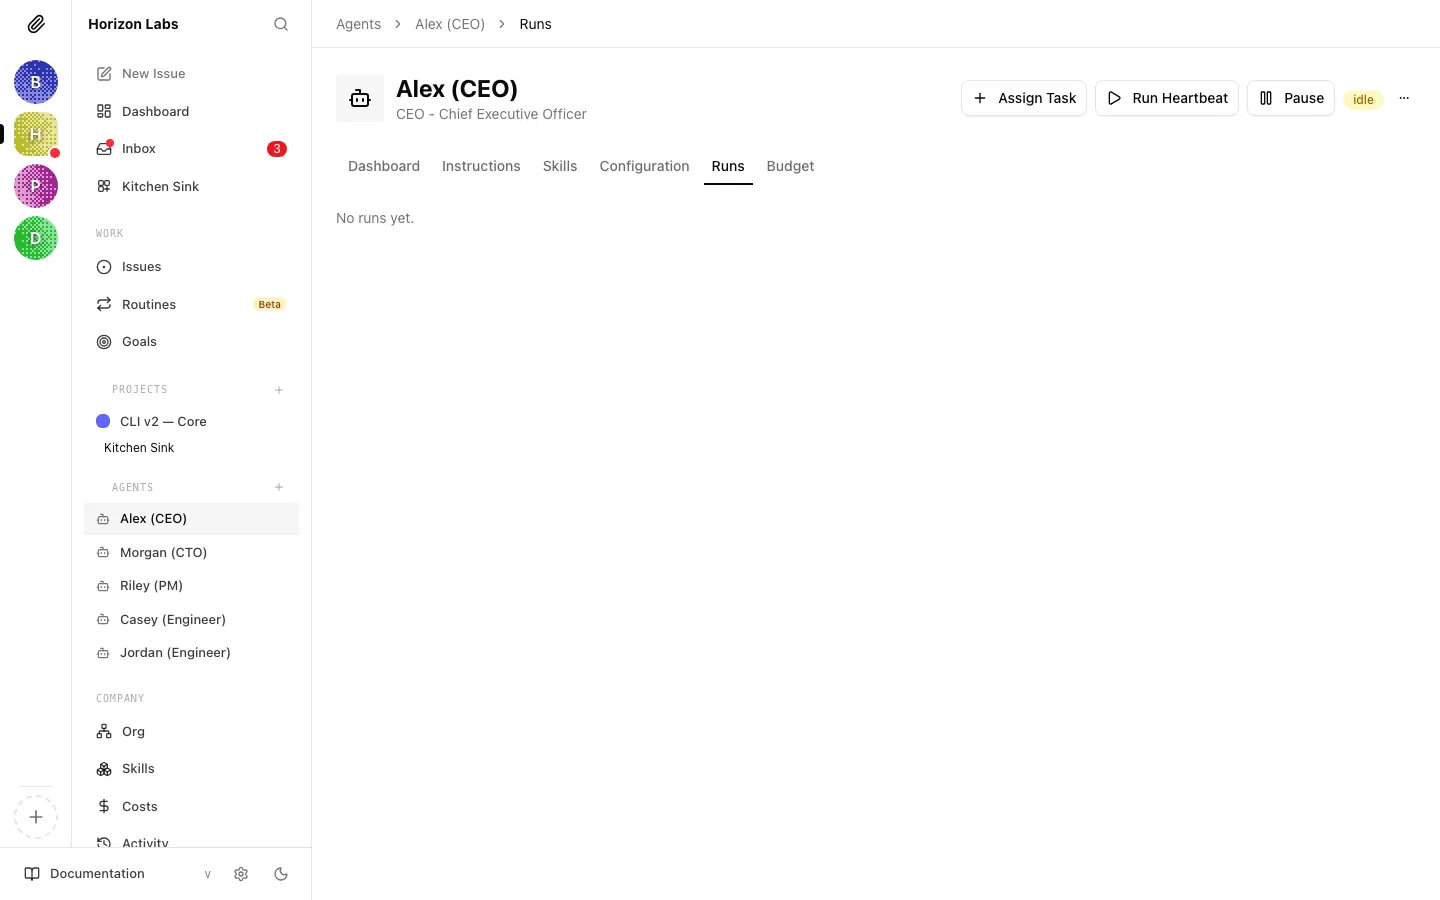
The run list
Section titled “The run list”Each entry in the list shows:
- A status icon (succeeded, failed, running, queued, timed out, cancelled)
- A short run ID
- The run’s invocation source pill (Timer / Assignment / On-demand / Automation)
- Input + output tokens and cost (when cost is non-zero)
- A relative timestamp
- A short excerpt from the result summary
On desktop, the list sits in a narrow left column and clicking a run opens the detail to the right (you can step through runs quickly without navigating away). On mobile the list takes the whole screen and tapping a run pushes into a detail view with a Back button.
Paperclip auto-selects the latest run on desktop so you always have something in the detail pane when you land on the tab.
The run detail
Section titled “The run detail”The detail view has several stacked blocks:
- Status & timing: status badge, start time, end/elapsed time, duration, a Cancel button (live runs only)
- Retry and resume controls: failed or timed-out runs get a Retry action that re-wakes the agent with the same task context; runs that died because the process was lost (
errorCode = process_lost) get a Resume action that picks up from the same point - Metrics: input / output / cached tokens, total cost, provider, model
- Session continuity: the before/after session IDs the adapter used; highlighted when the session changes mid-run
- Invocation card: the exact prompt, context, and environment the adapter used, with secrets redacted (
***REDACTED***) and JWT values masked - Transcript: the full conversation between the agent and the model, rendered with tool calls inline
- Log viewer: raw output chunks with timestamps, useful when the transcript isn’t enough
- Touched issues: the set of issues the agent interacted with during this run, with links and a Clear sessions for touched issues action (handy after a bad run corrupted session state)
Live runs
Section titled “Live runs”When a run is in-flight, the transcript and log viewer stream in real time. The header shows an animated status, an elapsed-time counter, and a cancel button. The Scroll-to-bottom helper sticks you to the latest output until you scroll up to read history, at which point it lets go so you don’t get yanked around.
Cancelling, retrying, resuming
Section titled “Cancelling, retrying, resuming”- Cancel , interrupts a running or queued run. The run moves to
cancelledstatus. - Retry: creates a new run with the same task context. Use when a run failed for a recoverable reason (transient network error, adapter glitch).
- Resume , only appears when a run failed because the adapter process was lost. Paperclip re-wakes the agent and passes a
resumeFromRunIdso the next run can pick up instead of restarting.
Filters and sorting
Section titled “Filters and sorting”The list is sorted by creation time descending. There are no additional filters on the Runs tab itself. Use the Dashboard’s charts for aggregate views, or jump to individual issues to see per-task run history.
Budget Tab
Section titled “Budget Tab”Every agent can have its own budget. The Budget tab is where you set it, watch the current spend, and configure how Paperclip should react when limits are approached or breached.
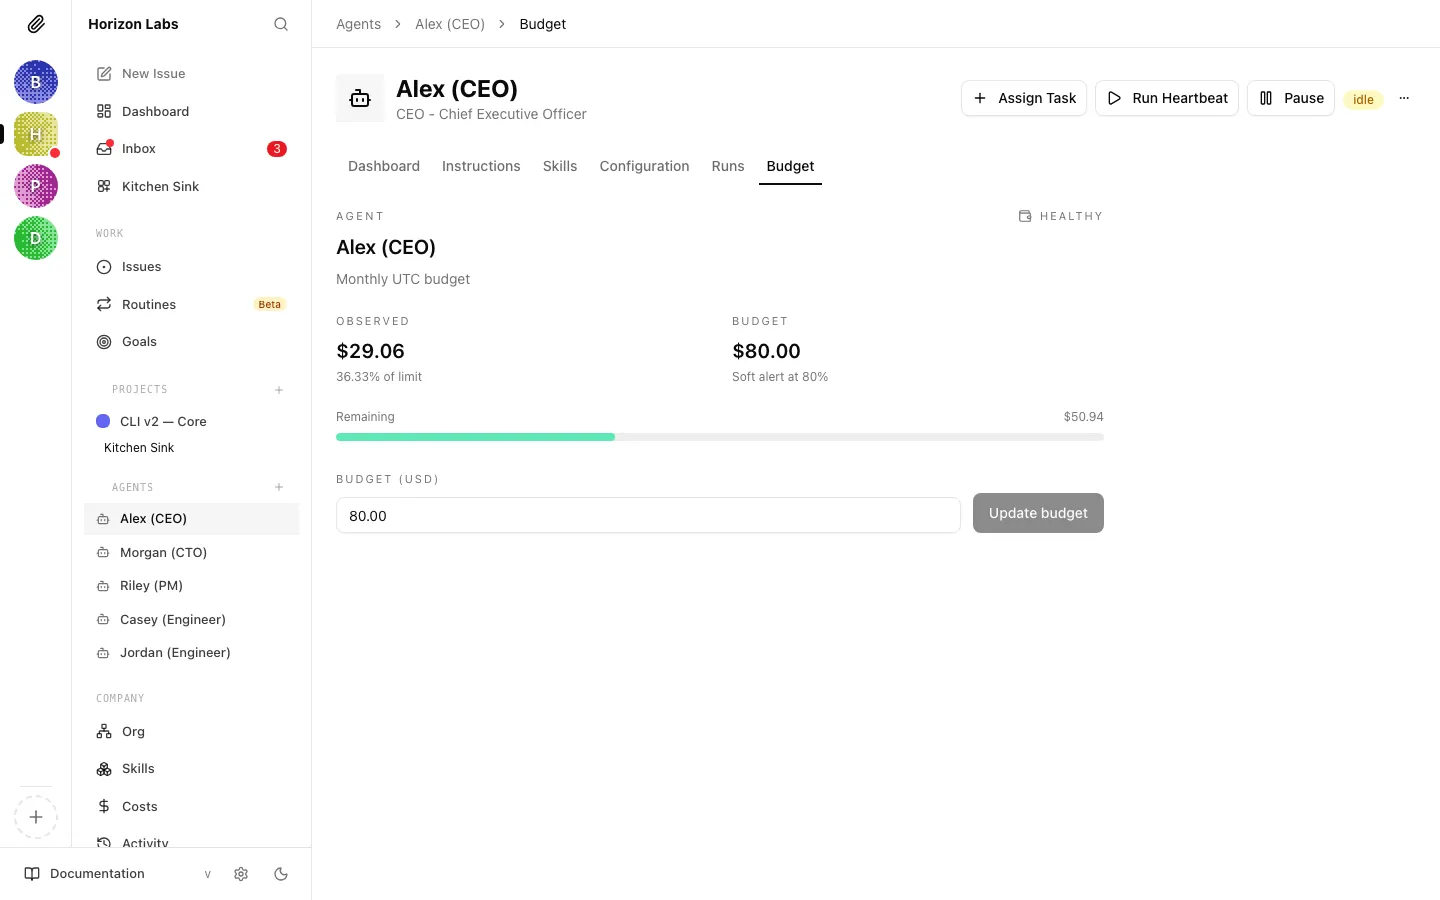
Anatomy of an agent budget
Section titled “Anatomy of an agent budget”A budget has four pieces:
- Window kind: either Monthly UTC (spending resets on the first of each month, UTC) or Lifetime (never resets; the agent gets this much total, ever)
- Amount: the spending cap in cents (displayed as dollars)
- Warn percent: the soft-alert threshold, e.g. 80%. When spend crosses this, the agent moves to
warningstatus and the header shows an amber indicator. - Hard stop: the enforcement behaviour when spend reaches 100%. By default, Paperclip pauses the agent (
pauseOnExceed = true) so it consumes no further budget until a board user resumes it or raises the limit.
The policy card
Section titled “The policy card”The card on this tab shows:
- An icon and colour corresponding to the current state (Healthy wallet, Warning triangle, Hard-stop shield)
- The window label (Monthly UTC budget / Lifetime budget)
- Current spend vs. cap, as a number and as a progress bar
- The soft-alert threshold
- Pause status and pause reason, if paused
Editing the budget
Section titled “Editing the budget”Use the edit control on the card to change the amount. Depending on your permissions and the agent’s reporting chain, some fields may be read-only. In particular, subordinate agents can propose budget increases but not approve them. When a policy’s hard stop is hit, a Budget Override approval may be created for you to approve a one-time increase or a permanent raise.
What happens at each threshold
Section titled “What happens at each threshold”- Below the warn threshold: normal. The agent runs as scheduled.
- Between warn and hard stop ,
warningstatus. The agent keeps running. Consider triaging: is the agent doing what you want, or is it burning budget on low-value work? - At or above the hard stop ,
pausedstatus withpauseReason = "budget". The agent stops taking heartbeats until you resume, raise the cap, or the window resets (monthly only).
Agent-level vs company-level
Section titled “Agent-level vs company-level”This tab configures this agent’s budget. Paperclip also tracks a company-level budget that sums across agents. See Costs & budgets for how the two interact, how API costs are computed, and how to tune budgets as a portfolio rather than one agent at a time.
An agent authenticates to the Paperclip API with a short-lived JWT for in-process runs. When the agent needs a standing token (for example a remote adapter, a CI integration, or an external system triggering webhooks) it uses a long-lived API key instead.
The Keys panel sits on the Configuration tab (under the configuration form, above the revisions collapsible).
Issuing a key
Section titled “Issuing a key”- Type a name for the key (e.g.
production,ci,integration). A clear name makes audits easier later. - Click Create.
- Paperclip shows the full token in a yellow banner. Copy it now. The plaintext token is only shown this once. After you dismiss the banner, Paperclip only stores a hash and can never show it again.
The banner has a show/hide eye toggle so you can reveal the token to paste it, and a copy-to-clipboard button. When you’re done, click Dismiss.
Active keys
Section titled “Active keys”Every un-revoked key is listed below the create form, showing its name and creation timestamp. You can see how many keys exist and when each was made (useful for rotation reviews).
Revoking a key
Section titled “Revoking a key”Click Revoke next to any active key. The key moves to the Revoked Keys section at the bottom of the panel (displayed with a strikethrough and dimmed), and is immediately rejected by the Paperclip API. Revocation is permanent. Revoked keys are never reused. To rotate a key, create a new one, swap it in wherever the old one is used, then revoke the old one.
Where keys flow
Section titled “Where keys flow”An agent’s API key is typically configured in the adapter settings within the web app. For in-heartbeat calls by managed adapters, the key is a short-lived run JWT auto-injected by Paperclip. You don’t need a long-lived key at all. For remote adapters and external integrations, you do.
Tip: Revoke keys aggressively. It’s cheaper to issue a new one than to wonder whether a forgotten key is floating around.
How Agents Are Invoked: The Heartbeat Model
Section titled “How Agents Are Invoked: The Heartbeat Model”This section collects the conceptual material you need to reason about what an agent is at runtime. If you’ve read other Paperclip guides you may have seen pieces of this; everything is gathered here so the agent surface above makes sense.
Execution model
Section titled “Execution model”Every heartbeat follows the same six-step arc:
- Trigger: something wakes the agent (schedule, assignment, mention, manual invoke)
- Adapter invocation: Paperclip calls the agent’s configured adapter
- Agent runtime: the runtime calls your selected provider via BYOK and brings the agent online
- Paperclip API calls: the agent checks assignments, claims tasks, does work, updates status
- Result capture: the adapter captures output, usage, costs, and session state
- Run record: Paperclip stores the run result for audit and debugging
Each of those steps corresponds to something visible in the Runs tab: the trigger shows up as the invocation source pill, the adapter invocation is the Invocation card, the transcript and logs show what the agent did, the API calls appear in the touched-issues list, the result capture populates the metrics block, and the run record is the run itself.
Agent identity
Section titled “Agent identity”Every agent has context variables injected at runtime:
| Variable | Description |
|---|---|
PAPERCLIP_AGENT_ID | The agent’s unique ID |
PAPERCLIP_COMPANY_ID | The company the agent belongs to |
PAPERCLIP_API_URL | Base URL for the Paperclip API |
PAPERCLIP_API_KEY | Short-lived JWT for API authentication |
PAPERCLIP_RUN_ID | Current heartbeat run ID |
Additional context variables are set when the wake has a specific trigger:
| Variable | Description |
|---|---|
PAPERCLIP_TASK_ID | Issue that triggered this wake |
PAPERCLIP_WAKE_REASON | Why the agent was woken (e.g. issue_assigned, issue_comment_mentioned) |
PAPERCLIP_WAKE_COMMENT_ID | Specific comment that triggered this wake |
PAPERCLIP_APPROVAL_ID | Approval that was resolved |
PAPERCLIP_APPROVAL_STATUS | Approval decision (approved, rejected) |
These are exactly what you’ll see in the Invocation card on any run. Paperclip redacts secrets (anything that looks like an API key, a bearer token, a password, or a JWT) before displaying them, but the structure is the same as what the agent actually received.
Session persistence
Section titled “Session persistence”Agents maintain conversation context across heartbeats through session persistence. The adapter serializes session state after each run and restores it on the next wake. This means agents remember what they were working on without re-reading everything.
On the Runs tab, each run shows a session ID before and session ID after. A differing pair means the session rotated during the run; an equal pair means the agent continued the same conversation. The overflow menu’s Reset Sessions action wipes this state when you want the agent to start fresh on its next heartbeat.
Agent status
Section titled “Agent status”| Status | Meaning |
|---|---|
active | Ready to receive heartbeats |
idle | Active but no heartbeat currently running |
running | Heartbeat in progress |
error | Last heartbeat failed |
paused | Manually paused or budget-exceeded |
terminated | Permanently deactivated |
The status dot on every row and badge on the agent header reflect one of these values directly. The Active filter on the agent list includes active, running, and idle, because all three mean “this agent is healthy and doing (or ready to do) work”. Paused and Error are their own filters for triage.
Why this matters day-to-day
Section titled “Why this matters day-to-day”The heartbeat model has a few practical consequences worth keeping in mind:
- An agent that isn’t doing work isn’t costing you anything (past whatever the last run spent). Between heartbeats there’s no idle burn.
- Changing configuration takes effect on the next heartbeat, not the current one. If you edit Instructions while a heartbeat is running, that run uses the old instructions. The next run uses the new ones.
- Manual Run Heartbeat is your friend when testing changes. Save your edit, click Run Heartbeat, watch the live run stream in the Runs tab. Much faster than waiting for the timer.
- Paused agents are cheap. If you’re not sure whether to keep an agent, pause it. It will stop accumulating spend and its history is preserved for when you come back.
Common Workflows
Section titled “Common Workflows”A few end-to-end recipes for things you’ll do often.
Try a new instruction quickly
Section titled “Try a new instruction quickly”- Open the agent and go to the Instructions tab.
- Edit the entry file (usually
AGENTS.md). Save. - Click Run Heartbeat in the header.
- Switch to the Runs tab. The new run is selected automatically on desktop; on mobile tap it from the list.
- Watch the transcript stream. If the agent behaves as you want, you’re done. If not, repeat.
This loop is tight on purpose. Changes apply on the next heartbeat, and manual invoke gives you that heartbeat on demand.
Diagnose a misbehaving agent
Section titled “Diagnose a misbehaving agent”- Open the Runs tab, find the most recent failed run.
- Read the transcript for where the agent got confused.
- Open the Invocation card to confirm it received the right environment and instruction path.
- Check Touched issues: did it actually work on what it was supposed to?
- If the session is bad, use Clear sessions for touched issues or the overflow menu’s Reset Sessions.
- If the configuration is at fault, roll back on the Configuration tab.
Temporarily mute an agent
Section titled “Temporarily mute an agent”- Click Pause in the header. Status moves to
pausedand no further heartbeats will run. - Investigate at your leisure. The agent’s history is preserved.
- Click Resume when ready.
Use pause liberally. It’s reversible, cheap, and the right default when something is clearly off but you don’t have time to debug.
Rotate an API key
Section titled “Rotate an API key”- Open the Configuration tab, scroll to API Keys.
- Click Create, name the new key (e.g.
production-2026-04), copy the token shown in the yellow banner. - Swap the new token into whatever system was using the old one.
- Back on the Keys panel, click Revoke next to the old key.
- Confirm the revoked key moves to the bottom Revoked Keys section.
Raise a capped agent’s budget
Section titled “Raise a capped agent’s budget”- Open the Budget tab. The policy card shows current status, spend, and pause reason.
- Edit the amount on the policy card.
- If the change is within your authority, it saves immediately. If the agent is subordinate and an override is required, a Budget Override approval is created. See Approvals.
- Once the cap is raised and the agent is off hard-stop, click Resume in the header if it was paused by budget.
Related guides
Section titled “Related guides”- Skills: how the company skill library works, how skills are written, and how they keep agent context lean
- Agent adapters: which adapters are available, what each one is good at, and how to configure them
- Approvals: the governance layer around hire requests, strategy, and budget overrides
- Costs & budgets: how API spend is computed, how budgets are enforced, and how to tune them across your whole company