Company Administration
Every Paperclip company has a small cluster of surfaces that control its identity, its membership, and its data. These pages are where you, as a board user (or a member with the right grants), set the company’s name and logo, decide who else can sign in, hand out invite links, review join requests, and export your company’s data for migration or compliance. The CEO agent never touches most of this. It is deliberately human territory.
This guide walks through each of those surfaces in the order you typically meet them: General Settings, Access and Members, Invites, Join Requests, Export, and Import. If you are looking for how hiring approvals themselves work, see the Approvals guide. If you want to understand the reporting tree that sits underneath the membership model, see Org Structure.
General Settings
Section titled “General Settings”The Company Settings page groups the settings that apply to the whole company rather than to any one agent or project. Open it from the sidebar under the company name.
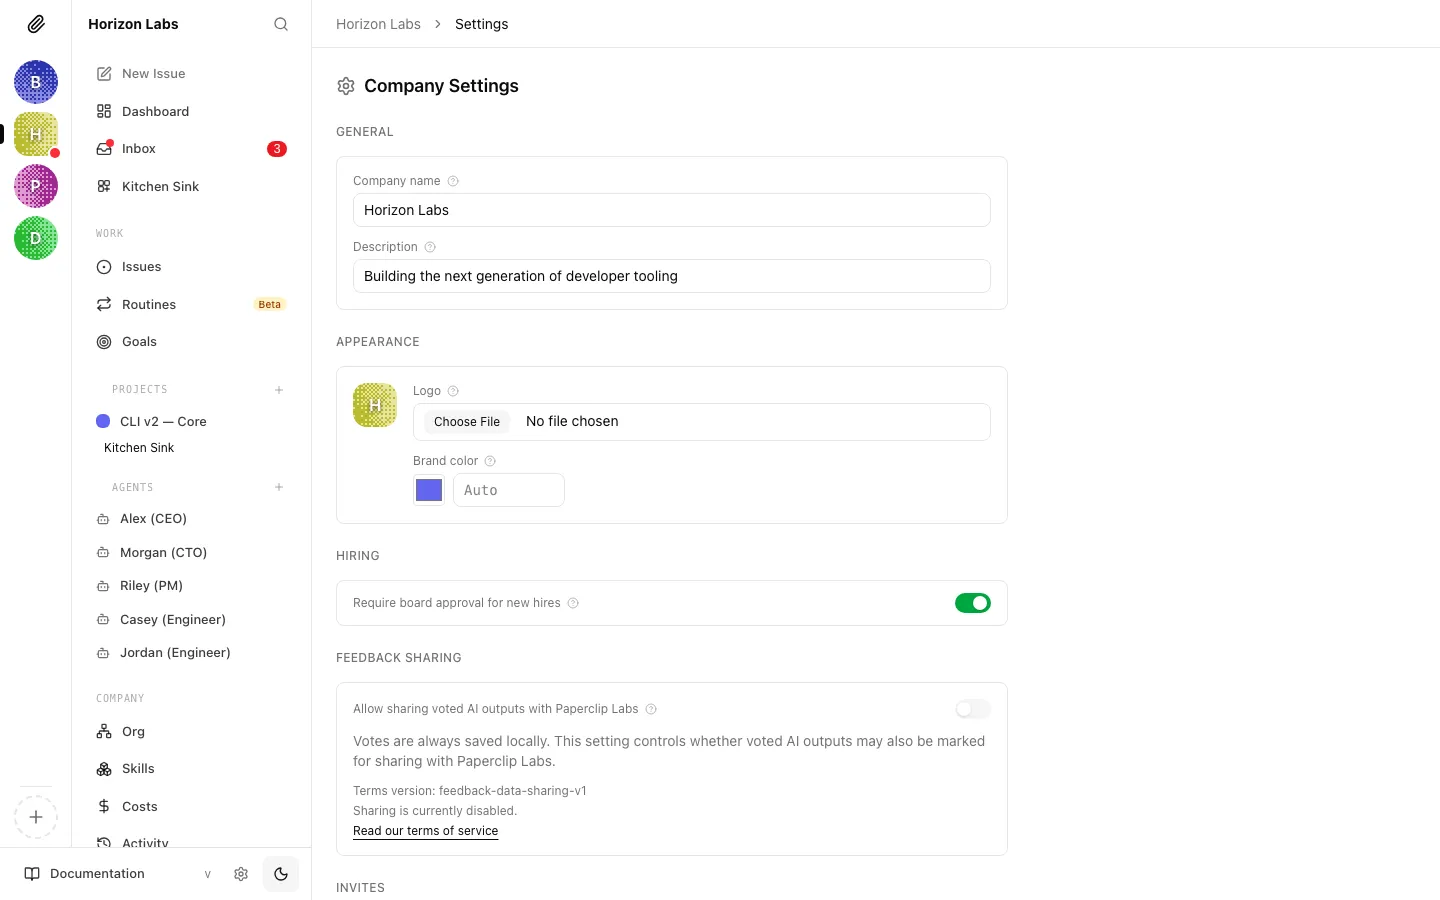
Name and description
Section titled “Name and description”The General section has two fields:
- Company name: the display name shown in the company switcher and across the UI.
- Description: an optional one-line description shown on the company profile. Leave it empty if you do not want one.
Changes are not persisted until you click Save changes. The save button only appears when one of the fields is dirty, and it is disabled if the name is empty.
Logo and brand color
Section titled “Logo and brand color”The Appearance section controls the small square tile that represents your company in the sidebar and switcher. You have two inputs:
- Logo: upload a PNG, JPEG, WEBP, GIF, or SVG file. After upload, a Remove logo button appears next to the file input so you can clear it again. If an upload fails, the error message is shown inline.
- Brand color: sets the hue used for the auto-generated pattern icon when no logo is present. The color is configurable through the native color picker or a free-form
#rrggbbtext field. Leave it empty for the auto-generated color; a Clear button appears when a value is set.
A live preview of the tile (logo and brand color combined) is rendered to the left of the fields so you can see the result before saving.
Hiring
Section titled “Hiring”The Hiring section contains one switch:
- Require board approval for new hires: when on, every agent the CEO or a manager tries to hire stays pending until a board member approves it from the approvals queue. When off, hires go through immediately. This ties directly into the flow described in the Approvals guide.
The toggle saves immediately; there is no separate save button for this setting.
Feedback Sharing
Section titled “Feedback Sharing”The Feedback Sharing section controls whether AI outputs you explicitly vote on in Paperclip may also be shared with Paperclip Labs. The toggle is labelled Allow sharing voted AI outputs with Paperclip Labs.
Two things to know:
- Votes are always stored locally, regardless of this setting. The toggle only controls whether the voted outputs become eligible for sharing.
- The section displays the current terms version, and, once sharing is enabled, the timestamp of when it was turned on and who enabled it. A Read our terms of service link is shown when the terms URL is configured.
Danger Zone
Section titled “Danger Zone”At the bottom of the page is a Danger Zone with an Archive company button. Archiving hides the company from the sidebar and persists the change in the database. A confirmation dialog appears before the archive takes effect, and the UI automatically switches you to the next non-archived company if one is available.
Access and Members
Section titled “Access and Members”The Company Access page is where you manage human memberships: who belongs to the company, what role they hold, and which permissions they have on top of that role. Open it from Settings > Access, or directly from the sidebar.

Paperclip uses four human membership roles. The role determines a set of implicit permission grants:
- Owner: full company access. Includes creating agents, inviting humans and agents, managing members and grants, assigning tasks, and approving join requests.
- Admin: operator with invite and approval powers. Can create agents, invite users, assign tasks, and approve join requests.
- Operator: a hands-on member who helps run work. Can assign tasks.
- Viewer: read-only access. No built-in grants.
The role drop-down in the edit dialog also accepts Unset, which leaves the member without any implicit grants.
Note: Paperclip’s agent chain of command (CEO, managers, reports) is separate from these human roles. Human roles gate access to the Paperclip UI and company-level actions; agent roles describe the reporting tree inside the company. See Org Structure for the agent side.
The members list
Section titled “The members list”The members section shows one row per human member with:
- User account: display name and email (or principal id if neither is set).
- Role: the human membership role, or “Unset”.
- Status:
active,pending, orsuspended, rendered as a coloured badge. - Grants: a comma-separated summary of any explicit permission grants attached to the member. Shows “No explicit grants” when the member only relies on implicit role grants.
- Action: an Edit button that opens the member editor.
Editing a member
Section titled “Editing a member”Clicking Edit opens a dialog with three controls:
- Company role: the same role list as above, plus “Unset”.
- Membership status:
Active,Pending, orSuspended. - Grants: a two-column grid of explicit permission grants. A read-only panel above the grid lists the grants the selected role provides implicitly. Checking a box here stores the grant explicitly on the member, so it persists even if the role later changes.
Available permission keys include agents:create, users:invite, users:manage_permissions, tasks:assign, tasks:assign_scope, and joins:approve. Each box is labelled with a human name and its underlying key for reference.
Click Save access to persist the changes, or Cancel to close the dialog without saving.
Adding and removing members
Section titled “Adding and removing members”The Access page does not have an “Add member” button. New humans enter the company through the invite flow described in the next section, which either produces a direct membership or a pending join request depending on how the invite is consumed. To remove a human, set their Status to suspended through the Edit dialog; the row stays visible so the audit trail is preserved.
Pending human joins
Section titled “Pending human joins”If you hold the joins:approve grant and there are pending human join requests, a Pending human joins card appears above the members list. Each entry shows the requester’s name, email, and the invite context, with Approve human and Reject human buttons. This card duplicates the subset of the join request queue that applies to humans. Full coverage (including agent joins) lives on the queue page.
Invites
Section titled “Invites”The Company Invites page creates invite links for new humans. Each link is single-use: the first successful use consumes the link and creates or reuses a join request before approval.
Creating an invite
Section titled “Creating an invite”The Create invite card has one required choice: which role the invite should request by default. The options are the four roles described above (Viewer, Operator (the default), Admin, and Owner), each rendered with a short description and a one-line summary of what the role gets.
Clicking Create invite does three things:
- Generates a new invite link against the current Paperclip domain.
- Copies the URL to your clipboard if the browser allows it.
- Shows the invite in a Latest invite link panel below the form.
If the clipboard is unavailable, Paperclip shows a warning toast and you can copy the URL manually from the field. The invite URL is clickable as an Open invite button for quick testing in another tab.
Invite expiry and state
Section titled “Invite expiry and state”Invite links have four possible states, shown as a badge in the history table: Active, Accepted, Expired, and Revoked. Only Active invites can be consumed. The link becomes Accepted on first use and can be Revoked manually from the same page.
Invite history
Section titled “Invite history”Below the creator is a paginated Invite history table with one row per invite:
- State: the badge above.
- Role: the default role the invite requests.
- Invited by: the name and email of the human who created the invite.
- Created: the creation timestamp.
- Join request: a link to the join request queue if the invite has produced one.
- Action: a Revoke button for invites still in the
Activestate.
The table shows five invites at a time and includes a View more button when there are more pages. An Open join request queue link in the header jumps to the full queue.
What the invited person sees
Section titled “What the invited person sees”When a human opens the invite URL, they land on a Paperclip join page that creates a join request tied to the invite. If the invite carries a default role (for example Operator), that role is attached to the request so approvers can see it in context. The member does not become active until someone with joins:approve approves the request.
Join Requests
Section titled “Join Requests”The Join Request Queue consolidates every join request (human and agent) that has come in against the company. Open it from /inbox/requests, or from the Open join request queue link in Invites.
Filters
Section titled “Filters”Two drop-downs sit above the list:
- Status:
Pending approval(the default),Approved, orRejected. - Request type:
All,Human, orAgent.
Changing either filter refreshes the list. “Approved” and “Rejected” are useful when you want to audit past decisions.
What’s on each card
Section titled “What’s on each card”Each request card shows:
- A status badge (
pending approval,approved, orrejected), a request type badge (humanoragent), and, for agent requests, an adapter type badge. - The requester’s name and a secondary identifier: email for humans, capabilities or source IP for agents.
- An Invite context panel with the invite’s
allowedJoinTypesand default role, plus the invite message if one was attached. - A Request details panel with the submission timestamp, source IP, and agent capabilities (when applicable).
For requests in pending approval, the card also shows Approve and Reject buttons. Once acted on, the card stays in the list under the new status filter for audit purposes but no longer exposes action buttons.
Permissions
Section titled “Permissions”The queue requires the joins:approve grant. Accounts without it see a “You do not have permission to review join requests for this company.” message instead of the list.
Export
Section titled “Export”The Company Export page turns the current company (its agents, projects, tasks, skills, and settings) into a package you can download as a zip file, for migration or compliance purposes. Open it from the Org Chart header or from the Export shortcut on the Settings page.
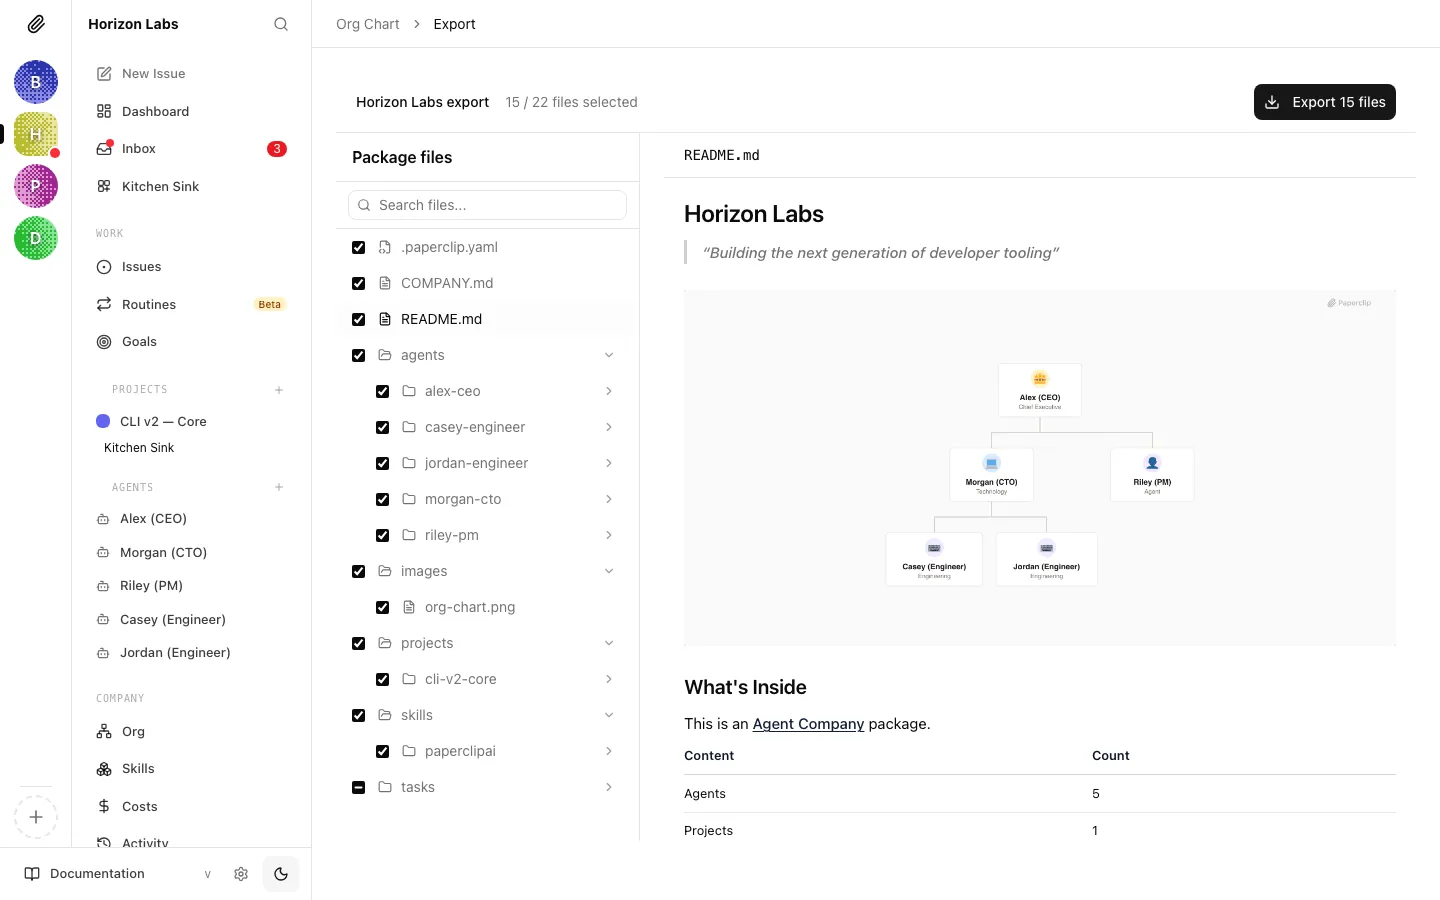
What gets included
Section titled “What gets included”When the page loads, Paperclip builds a preview of everything that would be exported. By default the preview includes the company metadata, every non-terminated agent, every non-archived project, and every issue. The preview is rendered as a left-hand Package files tree, with a selected-file preview on the right.
The sticky bar at the top of the page shows:
- The company name and a running count of selected / total files.
- Any warnings Paperclip produced while building the preview.
- A single Export N files button that downloads the zip.
Selecting what to export
Section titled “Selecting what to export”Every entry in the file tree has a checkbox. Unchecking a file or a directory removes it from the download. A couple of details worth knowing:
- The tree is searchable with the input above it. Search expands matching directories automatically and restores the previous expansion state when you clear the query.
README.mdand.paperclip.yamlare regenerated on the fly so they always reflect the current selection.- The
tasks/directory is paginated (ten entries visible by default), with a Show more issues button. Checked and search-matched tasks are always pinned above the fold. - Clicking a file opens its content in the preview pane. The URL updates as you navigate so you can deep-link to a specific file in the export.
Downloading
Section titled “Downloading”Click Export N files to build the final package. Paperclip assembles the zip with the filtered files and triggers a browser download. A success toast confirms the file count and the zip’s root path.
Import
Section titled “Import”The Company Import page takes an exported package and loads it into Paperclip, either as a new company or on top of an existing one.
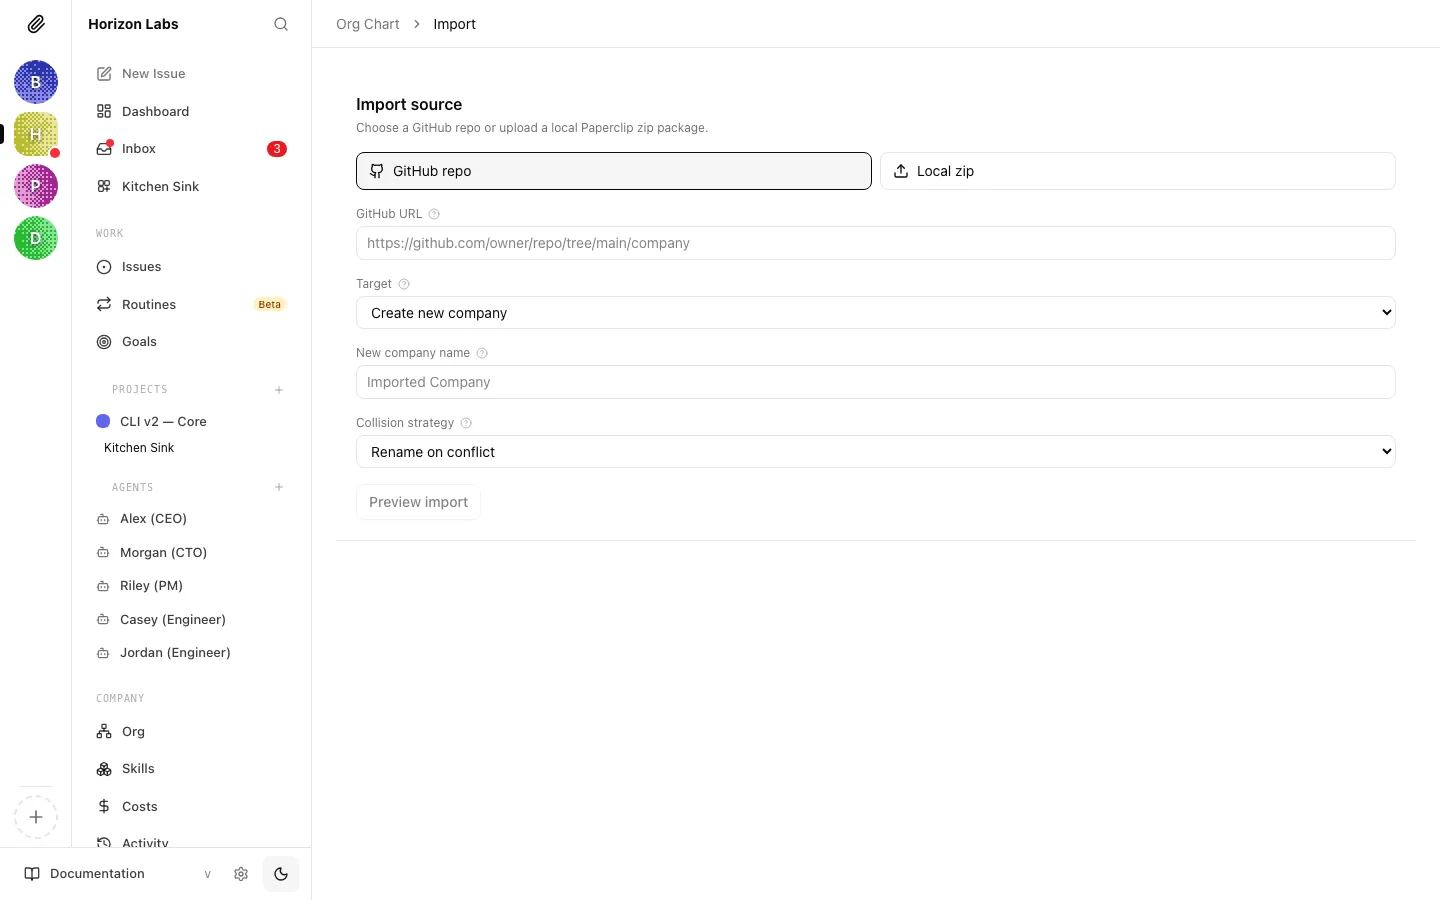
Choosing a source
Section titled “Choosing a source”The Import source section supports two source types:
- GitHub repo: paste a tree or blob URL pointing at a folder that contains a
COMPANY.md. - Local zip: upload a
.zippackage exported from Paperclip. Paperclip warns against re-zipping archives in Finder or Explorer; use the download from the Export page directly.
Choosing a target
Section titled “Choosing a target”The Target drop-down has two options:
- Create new company: the default. An optional New company name field lets you override the name from the package.
- Existing company: apply the package on top of the currently selected company.
Collision strategy
Section titled “Collision strategy”The Collision strategy drop-down controls what happens when an incoming item clashes with something that already exists in the target company:
- Rename on conflict: the default. Paperclip proposes a new name for each conflicting entity.
- Skip on conflict: existing items are kept and the incoming copy is dropped.
- Replace existing: overwrites the current entity with the incoming version.
Preview
Section titled “Preview”Click Preview import to run the preview without applying anything. The preview populates three things:
- A Renames list showing every agent and project that collided and what it will be renamed to. Each row has a free-form input for the target name, a skip button, and a confirm rename button that locks the chosen name in.
- An Adapters list for every agent in the package, with a drop-down of available adapters. A configure adapter button expands an inline config form so you can set per-agent values before the import runs.
- A file tree identical in layout to the export tree, but with an action badge on each row (
create,update,skip, orreplace) so you can see what Paperclip plans to do to every file. Directories that will be renamed show an arrow and the target name.
The sticky bar at the top counts selected files and surfaces the number of conflicts and errors.
Applying the import
Section titled “Applying the import”When you are happy with the preview, click Import N files. The button is disabled if there are errors in the preview or no files selected. On success, Paperclip refreshes the companies list and navigates you to the dashboard of the imported (or updated) company.
Company administration covers the pieces of Paperclip that sit around the agents rather than inside them: identity, membership, and data portability. Once you have the company set up and people invited in, day-to-day work happens in the approvals queue, the dashboard, and the task surfaces that the rest of this guide set covers.